Mastering WordPress Menus: Custom Links, Submenus & Styling Tips
When building a WordPress site, your navigation menu is one of the most important pieces of the puzzle—it guides visitors to where they want to go. But many users don’t realize how much control they actually have over menus in WordPress.
In this post, I’ll walk you through how to:
- Create default WordPress menus
- Use custom links for more flexibility
- Build submenus (dropdown navigation)
- Style one menu item differently with CSS
- Open links in new tabs without losing your site
Let’s get started.

Finding and Creating Menus in WordPress
From your WordPress Dashboard, navigate to:
Appearance → Menus
Here’s what you need to know:
- You can have multiple menus (header, footer, or sidebar).
- A menu is built from “menu items,” which can be pages, posts, categories, or custom links.
- If you create a new menu, give it a name and hit Create Menu.
⚠️ Watch out: Don’t check “Automatically add new top-level pages”. Doing so can clutter your navigation every time you publish a new page.


Why Custom Links Are Better
Sure, you can click “Pages” or “Posts” and drop them into your menu—but I recommend always using custom links. Here’s why:
- More control over link text – A page might be titled “Become a Member Today!” but in your menu you may want it simply as “Membership.”
- Flexibility with URLs – You can link to:
- Any page on your site ( DownloadCopy code 1 /contact )
- External sites (like a store or social profile)
- Specific sections of a page with an anchor tag (e.g., DownloadCopy code 1 /contact#membership ).
This method gives you full control instead of being stuck with automatic labels.
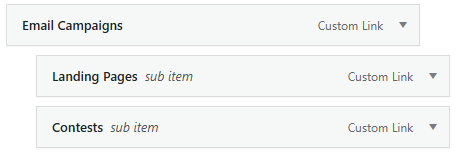
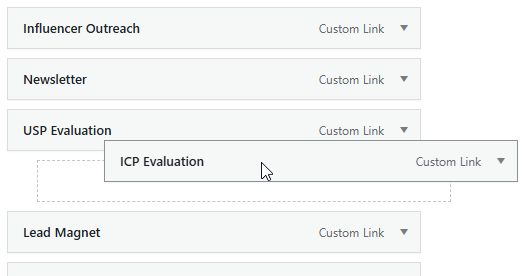
Creating Submenus (Dropdowns)
Want dropdown menus? Easy.
- Add a new menu item.
- Drag it slightly to the right beneath another item.
Now it’s a child of the parent menu item—this creates the dropdown effect.
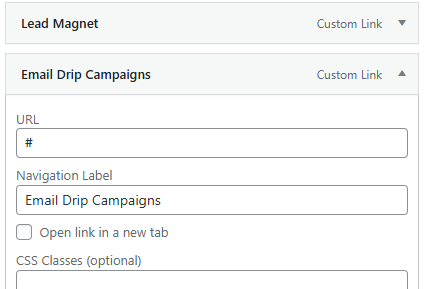
💡 Pro tip: If you don’t want the top-level menu item to be clickable, you can make its URL just “#”. That way it only serves as a heading for the dropdown, not a live link.
Reordering Items
Want to move “Contact” higher in your menu? Just drag and drop items up or down. You can even nest multiple levels of submenus this way.

Styling One Menu Item Differently
Sometimes you want a special highlight—like making “Sign Up” or “Buy Now” stand out. By default, WordPress doesn’t show this option, but you can unlock it.
- In the menu screen, go to the Screen Options tab (top-right).
- Enable CSS Classes.
- Now, when editing a menu item, you’ll see a “CSS Classes” box. Add a class like: DownloadCopy code 1 highlight-button .
- In your stylesheet, give it custom styling—e.g., a red background and bold text.
This is perfect for making a key action jump out to visitors.
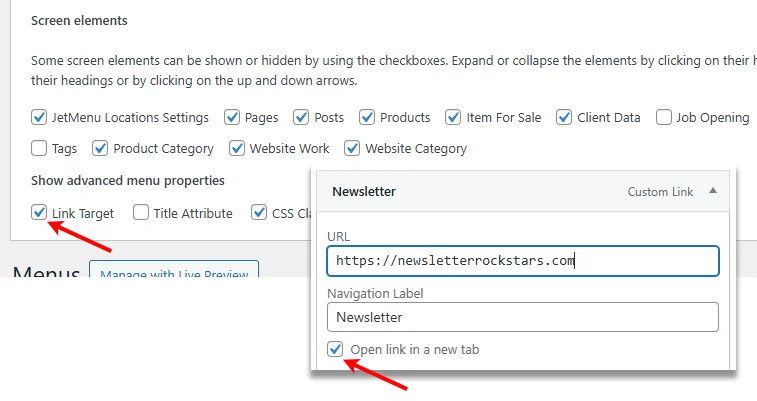
Opening Links in a New Tab
If you’re linking to an external site, you usually want to open it in a new tab so visitors don’t leave your site.
To enable this:
- In Screen Options, enable Link Target.
- Check “Open link in a new tab” when editing that item.
Now external pages will open in a new browser tab, while your site stays open in the background.
Wrap Up
Menus may seem simple, but with custom links, submenus, styling, and link settings, you have a lot of power to create a navigation that’s clear, flexible, and user-friendly.
If you’d like help setting up your menus—or any other WordPress or marketing questions—reach out at CW Dynamic.